Layers, Mask and Clipping, Photoshop Elements 13
Layers and Masks
Image and Adjustment Layers and Masks
Let's do a little Layer Mask and Adjustment Layer work first before getting to clipping.
Masks and especially Clipping Masks seemed so complicated at first, then they began to seem simple, so I wrote the essentials ("elements") down, and that made it all seem complicated again. See the notes at the bottom of this page. Here is a distillation such as I have not found all in one place to date on the Net. It will be quite a technical read.
Either a "content" layer, like an image, or an "adjustment" layer, like a Levels Layer, can be attached to a mask.
So, terminology: make sure you know what, in the Layers Panel, is i) a Layer Thumbnail, ii) a Layer Mask Thumbnail, and iii) a Clipping Mask (the latter will become clearer later). The layer below a clipping mask (or clipping mask group) is called the "Base Layer".
I'm assuming basic familiarity with PSE, so won't be defining every term. If you're completely lost here, then you need to do some more basic legwork first.
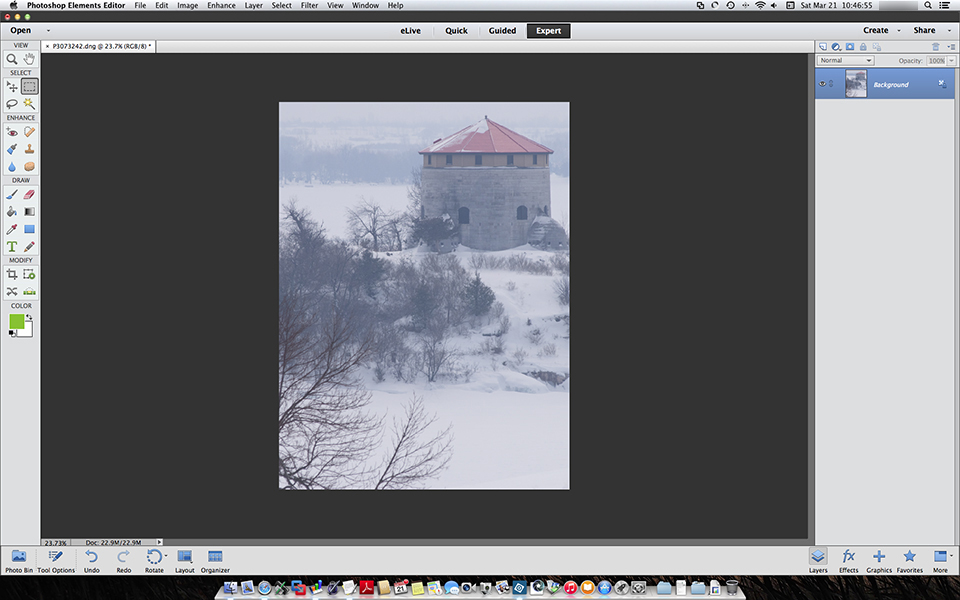 I suggest choosing a photograph of your own - I'm not providing mine for you to follow along on (sorry) - being careful not to modify the original. It will help if you have a photo which needs variable enhancement in different parts of it. Let's say the Tourism Board commissioned this photo for a brochure, and it looked nice on the shoot but was kind of blah when you took it off the memory card back at the studio.
A good first step might be to enhance just the tower, punch it up a bit without emphasizing the surroundings. So, let's make a selection of the tower, by whatever means seems best. I used mainly the "Quick Selection" tool - not the point however of this exposition. Fortunately in this example that worked fairly well - took a few minutes of selecting and then subtracting from the selection.
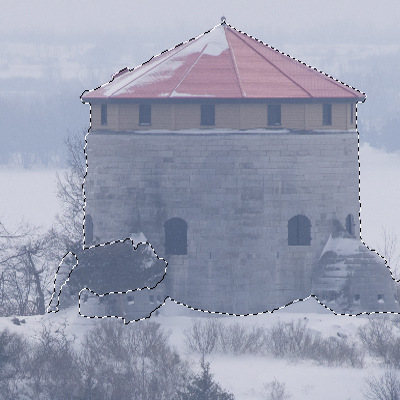
From there, I made an "Adjustment Layer", choosing to start (as I usually do) with a "Levels Adjustment Layer", and there are several ways to get to that. If in doubt, go to the Layers menu. One of the cool things is that the new layer comes ready-made with its own mask, created that way for me by PSE from the area I had selected. I title that layer "Tower Levels" - ignore the one above that for the moment (it's "invisible" at the moment anyway - notice the slash through the visibility icon).
It would be a good idea to save your work now, and once you're using Layers it will automatically save as a "PSD" file, a Photoshop proprietary format. You'll be guided through this, can rename and move the file, but it will now have the ".psd" filename extension. As long as you don't ever actually edit the Background Layer, everything you do can be undone or otherwise modified later. Of course, save periodically as you go along.
Notice also that PSE provides default names for new layers, but it can help to rename them something which will aid you in understanding your work when you come back to it later.
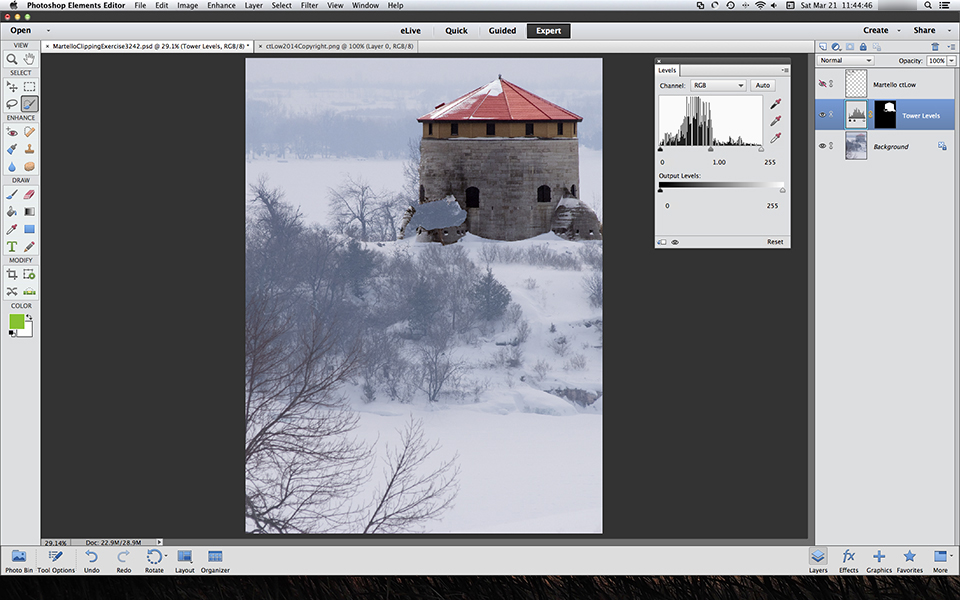 And when I worked the standard Levels magic, it's already looking a lot better, and happily without much edge-artifact (and without any editing at all on the Background Layer itself - again: good for future re-editing). (The details of what I did with "Levels" are not our topic - basically: histogram expansion.) There is however one ugly blotch, a tree which I had thought I would exclude from the original selection, but now it clearly just doesn't look right. Plus if viewed at higher magnification, there are a few rough spots along the left edge of the tower. From among several management options, here's a simple one:
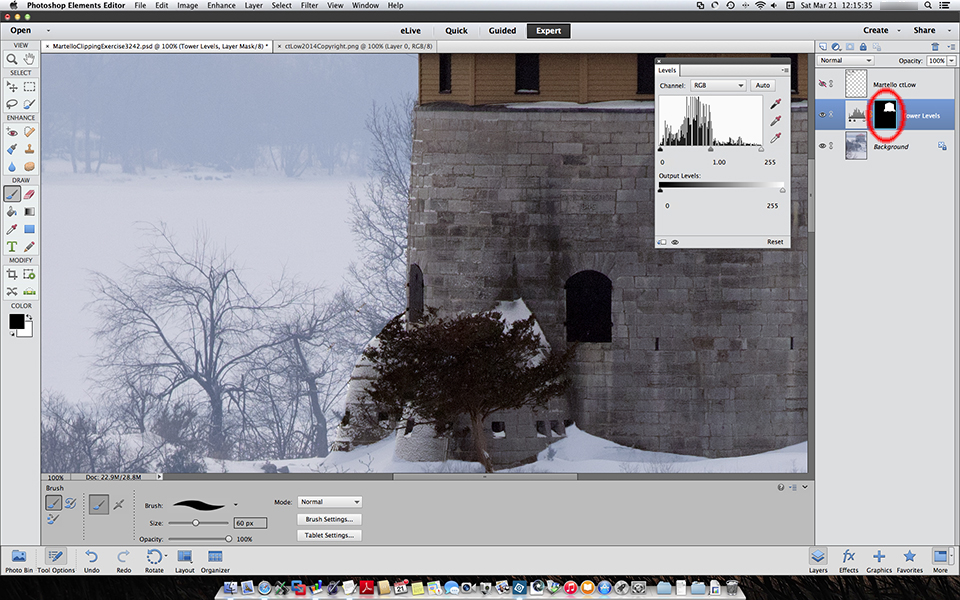
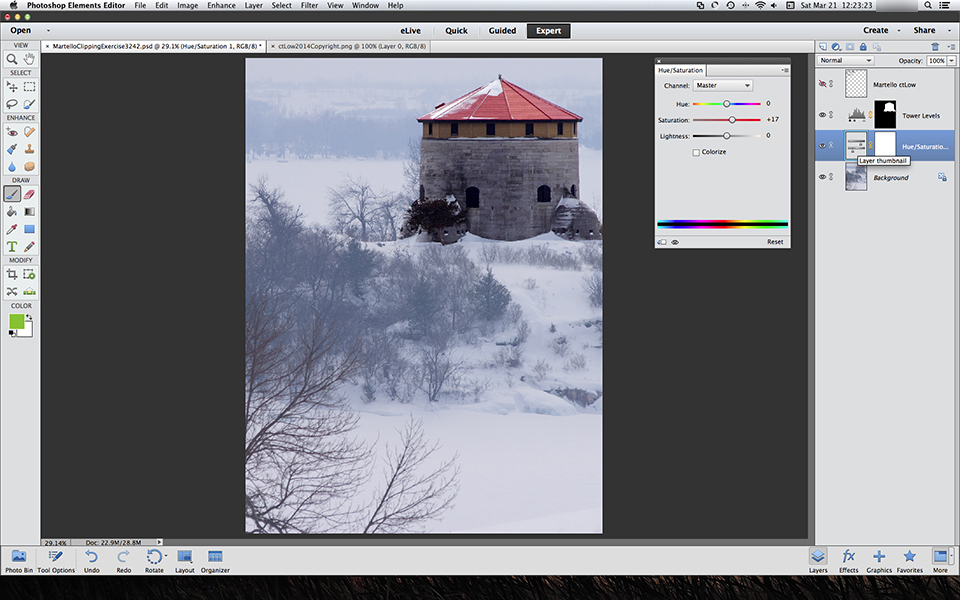
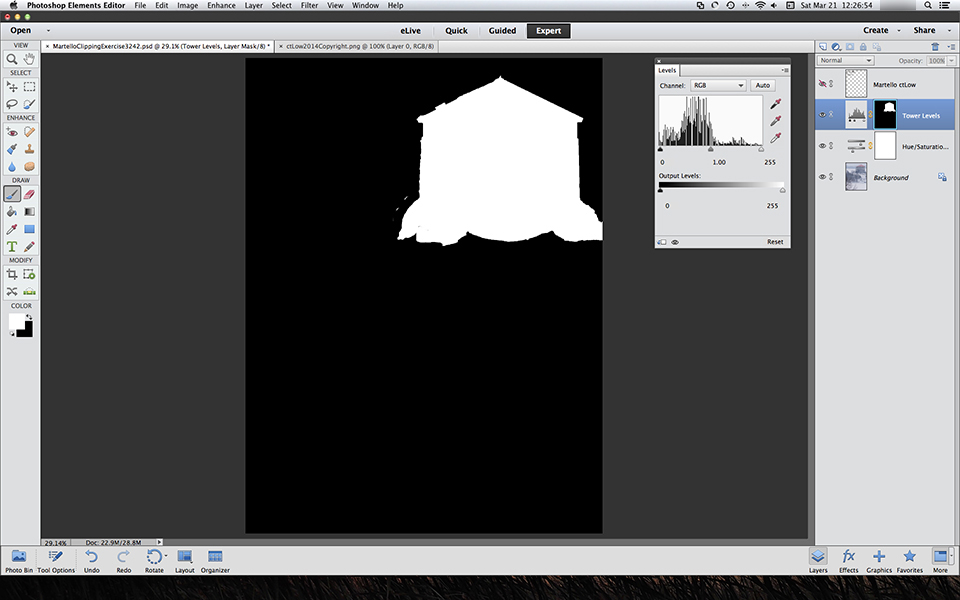
Choose the "Brush" tool, and also click to select the "Layer Mask Thumbnail", the little window to the right of the Levels Layer Adjustment Thumbnail. You'll see that the mask is selected, not the image to its left. I've circled the mask in red; on your own monitor, you'll see it "bordered" to help you know which is the active layer and thumbnail which you're working on. I'm going to paint on that Layer Mask, PSE only allowing shades of grey on masks. By pressing the "D" key on the computer keyboard, the foreground and background colours go back to "default", which is white and black. In order to modify the mask, one can carefully paint over the desired areas. It might help to magnify the image somewhat for accuracy, plus choose an appropriately-sized paint-brush - the square-bracket keys, "[" and "]", work well for this.
"White reveals and black conceals", so I paint white over the tree (on the main, large image), which doesn't turn white because I'm not painting on the image; I'm painting on the mask, and the white "reveals" the Levels effect. I also reverse the foreground and background colours with the "X" key on the keyboard, and "black out" portions of the mask where it had strayed off the left side of the tower. Notice that the mask thumbnail has a slightly modified shape from earlier.
Similarly, my next adjustment is often Saturation, so I get a Hue/Saturation Adjustment Layer going, and pump up the colour a bit. In this image, there isn't much colour apart from the tower, but let's say that we wanted to restrict the effect to the tower the same as we did for our Levels adjustment. All we have to do is copy the mask, but there are a few steps to this to get it to work.
Copy a Layer Mask
First, click on the source mask to select it. Then Alt-click it (Option-click on a Mac) and it will "load" and fill the screen. Select the entire mask image by whatever means you like (e.g. "Select All"), copy it, then Alt-click the Layers Mask Thumbnail again to "unload" it from the main viewing pane. Now click to select the destination Hue/Saturation Layer Mask, Alt-click to load it, paste the old mask onto it, and Alt-click to unload it. You have copied and pasted a mask.
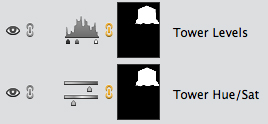 Masks can also contain grey, or combinations of white, grey and black. Think "gradient" and there will be times when this is most useful to prevent a jarring edge-effect; again however, not our topic here.
Clipping Masks
That was the easy part. It can take a while to get one's head around clipping masks.
I'm sure that there are several ways to do the following, but for illustration purposes, this will do. You'll notice that I created a layer with text on it, but have until now "hidden" it. It labels the type of tower in the upper left, and has my copyright notice in the lower right.
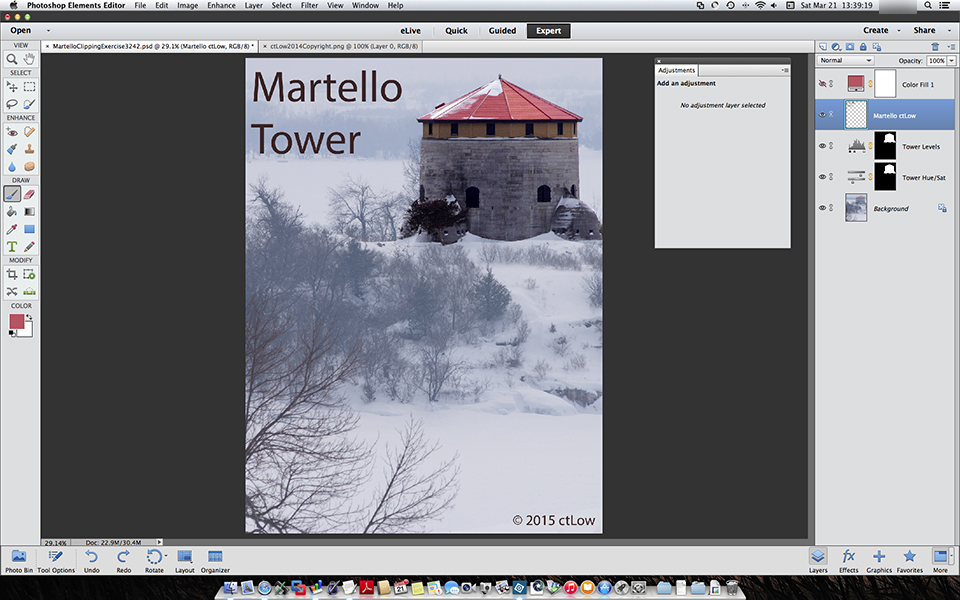
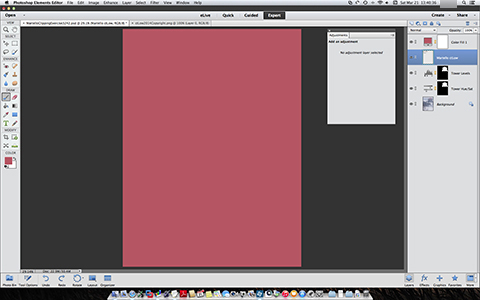 I've decided however that I wish the letters to match the colour of the tower's roof. I create a "Fill Layer" having previously changed the foreground colour to that of the roof.
It's a nice colour, but we would like the other parts of our image visible(!), so ...
... convert the Fill Layer to a "clipping mask". Do this with the upper (in this case "Fill") layer selected, one way then being to right-click it and click on "Create Clipping Mask". Note now how the fill (now "clipping") layer, uppermost, has indented and has acquired a little arrow pointing down at the layer to which it's clipped. The Base Layer's title is now underlined.
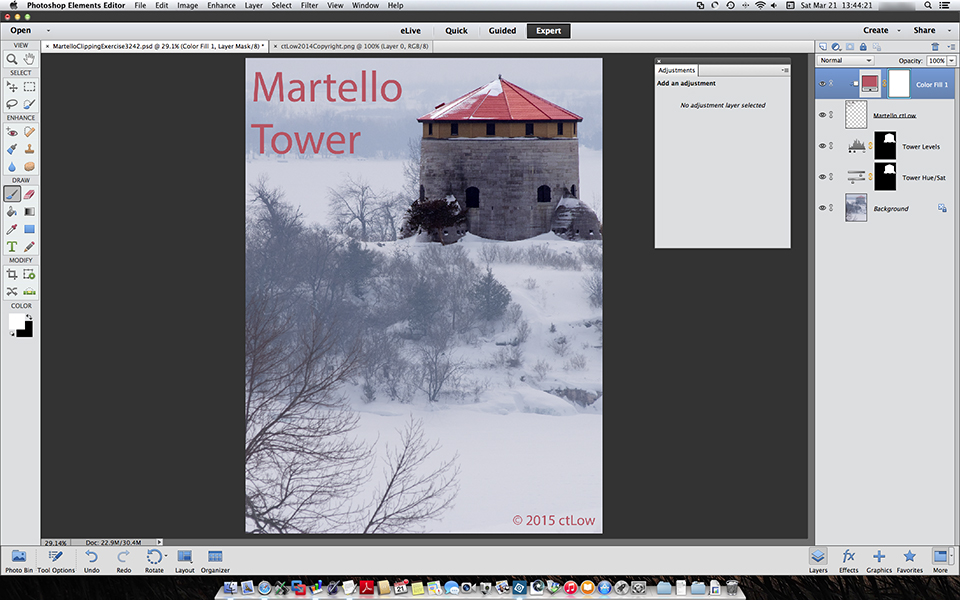
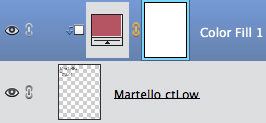 And this is non-intuitive bit, but just accept that this is the way it works. The "Base Layer", in this case the layer containing text, second from the top, controls only the visibility of the "clipping" layer. Anywhere on the Base Layer which is transparent (which here is most of it) hides the contents of the Clipping Layer, but ...
... everywhere on the Base Layer which is non-transparent reveals ...
... not itself but the contents of the clipping layer. This behaviours differs considerably from that of a standard Layer Mask.
"Huh?" I said, the first dozen times I read that. Let's explore that further. Let's say that in my admitted narcissism, I wish to append a self-portrait to the image, to solidify my copyright claim. So far so good.
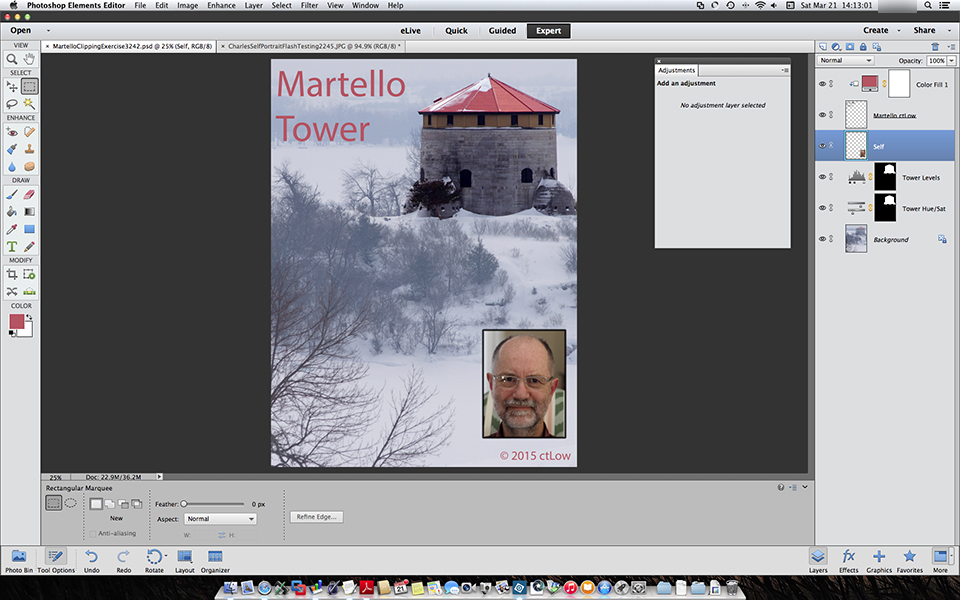
Then, being a simple man, I wish to merge the portrait layer with the text layer to keep things tidy. Let's see what happens. (If the Clipping Layer unclips when doing that, just clip it back on again.) I'll temporarily hide the original photo and its associated adjustment layers, for purposes of clarity/illustration.
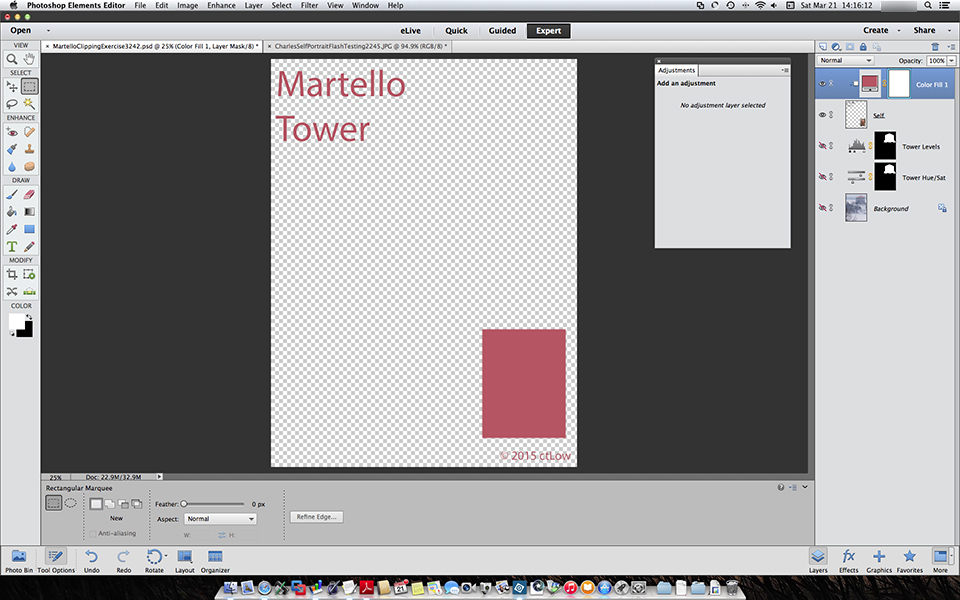
Hey! Where'd I go? What happened is just what should happen, but if it's taking a while to sink in, welcome aboard. Where the self-portrait went doesn't matter (it's still there, on the Base Layer - hidden); what matters is that it's non-transparent; it lets the Clipping Layer - reddish fill, in this case - show through. That's all it does. It goes from being a beautiful portrait to a mere (but often extremely useful) mask (but with different behaviour than a "Layer Mask"). It doesn't seem to make sense at first, that the content of the Base Layer doesn't matter - all that matters is that is has content. But that's the way Clipping Masks work .
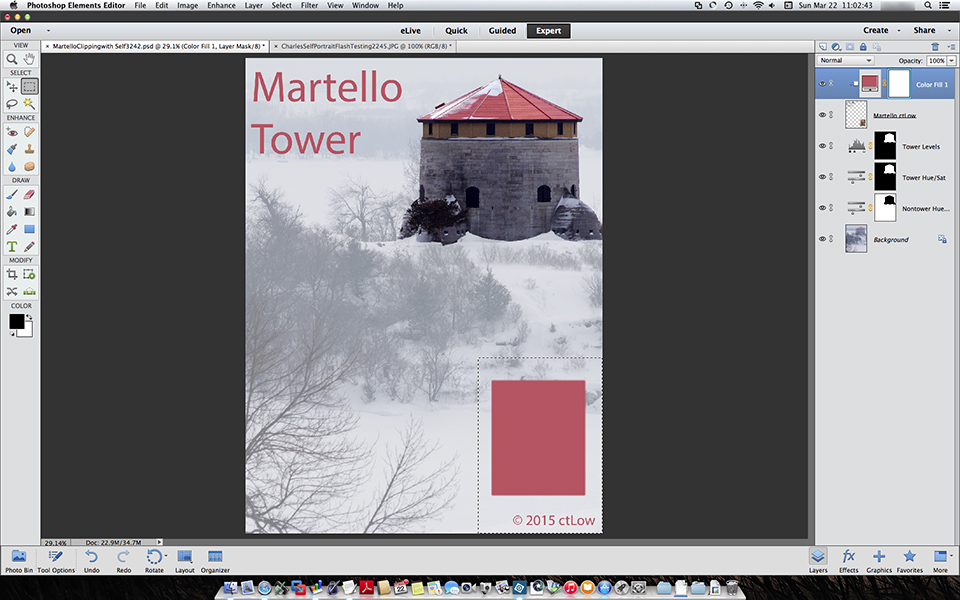
One way around that would be to paint over the clipping red Fill Layer Mask (not image!) using black, and while I'm at it I would like the copyright notice returned to its original colour as well. One way to paint is to make a selection box, and then paint - you don't have to worry about accuracy, because the selection box constrains any effect of the Brush tool within its lines. Or you could use "Fill Selection" (and choose "Black") from the Edit menu. See how the clipping red Fill Layer Mask thumbnail has changed, with a little black section in its lower right, constrained there during its creation by the Selection Box.
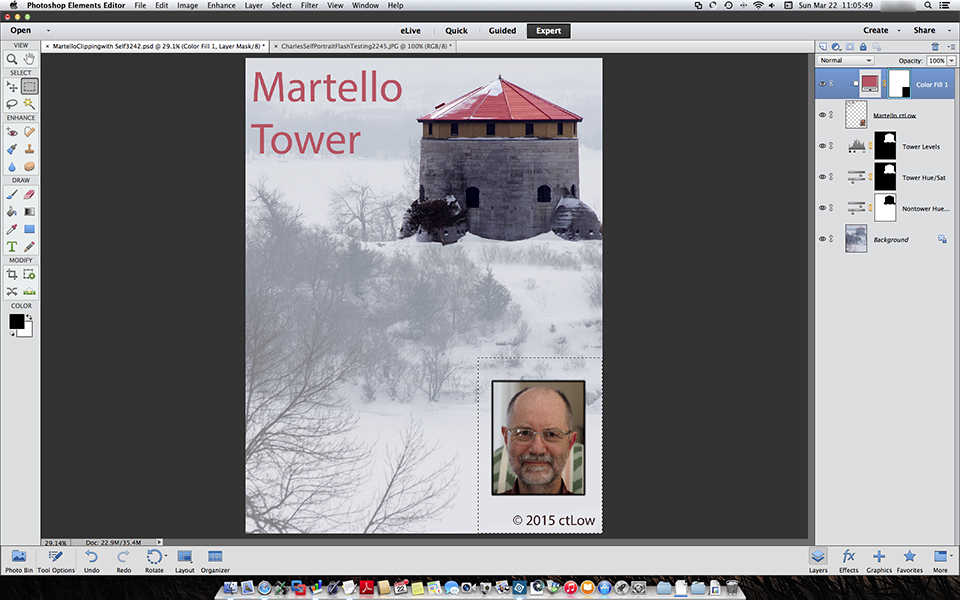
Exactly why that works, thinking of what that Fill Layer Mask is masking and then whether the masked red pixels are still "content" or whether they're "transparent" - or whether it matters - can be difficult, but once you do it a few times, at least it becomes clearer how it actually works.
I'm going to Undo and ditch the self-absorption, upon further reflection ("narcissism", get it?). I'll leave the copyright notice unreddened (and have unblackened a bit of the mask -not really necessary), and you'll see that in the red Clipping Fill Layer Mask. I'll also be changing the copyright notice colour to blue, to emphasize that we're not seeing the black from the red Clipping Fill Layer Mask ... you'll be getting the idea that that's not what Layer Masks do. The blue text never shows as blue, except where the red fill layer's mask is black. Feel free to go over the previous few paragraphs a few times.
Let's look at a few other tricks we can do with masks and clipping.
First, having emphasized the tower, let's de-emphasize everything else. With the Background Layer selected, add another Hue/Saturation Adjustment Layer, and, as before, copy the tower mask into this new layer's mask (instructions above). Then, with the new Adjustment Layer's mask still selected, click CTRL-I (Cmd-I) to "invert" it, so that the effect we're about to perform (desaturating and lightening) does not affect the tower.
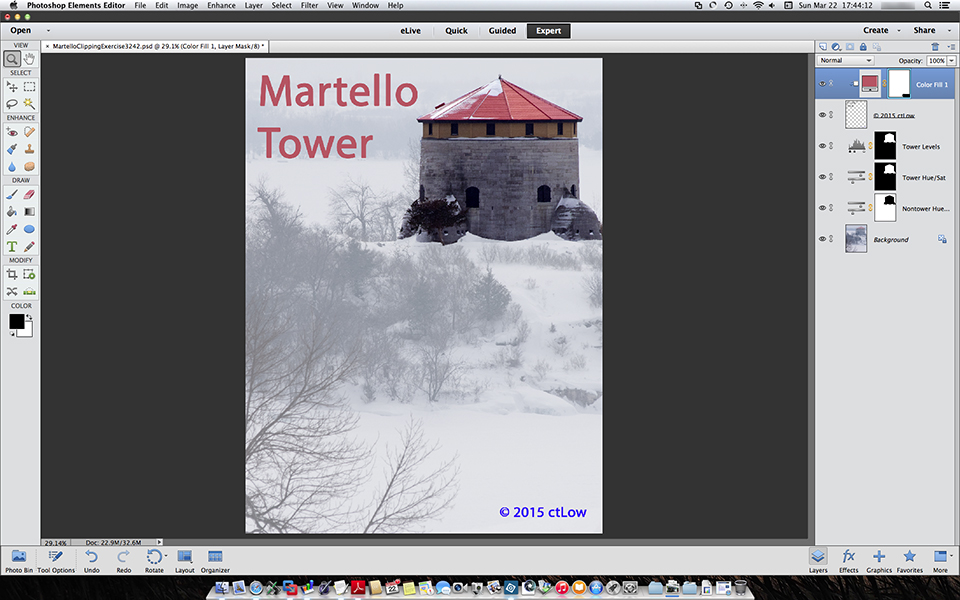
Note that the lower three Adjustment Layers could all be clipped to the Background Layer, but don't need to be because there is not (and cannot be) anything below that layer anyway, and Adjustment Layers only affect layers beneath themselves. So the text layer, higher up in the layer order, is unaffected. (Remember that that is one of the reasons for clipping the red Fill Layer, so that it doesn't affect everything below it.)
All cool. Let's say that we're almost done, and that the Tourism Board is going to buy our image, but they want the title a little more intense. A quick way to do that (apart from "bolding" it, which I've also done) is to add another Hue/Saturation Adjustment Layer above the red Fill Layer, and pump it up a bit.
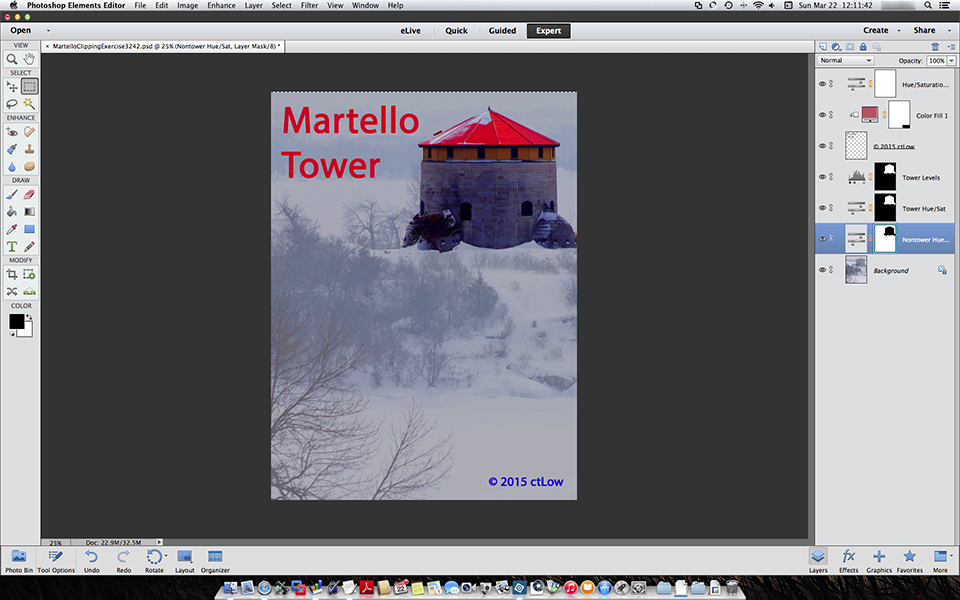
Notice however that if it's unclipped, then it intensifies all of the layers below it, making the tower roof particularly garish, and we don't want that. Clip it; effect accomplished.
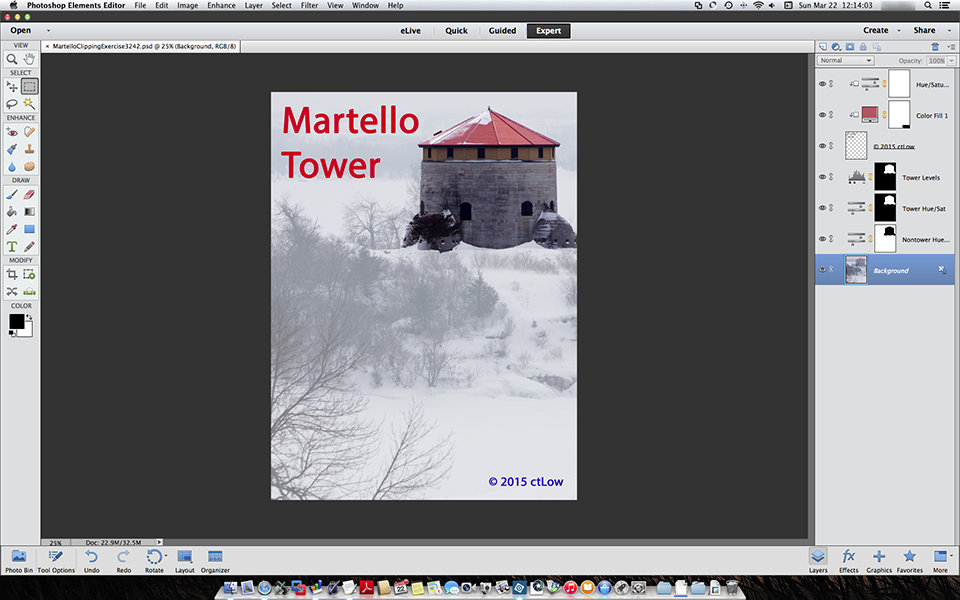
At this point, having Saved the finished image to disk, I may resize it and/or convert to a JPEG ("Flattening" all of the layers first, of necessity). But leave the PSD file unflattened and at full size - that's the whole point, that you can go back later and indefinitely, and adjust the editing - everything you have done is "non-destructive" to the original image. To save a flattened or smaller version without damaging the just-saved PSD file, rename it or save a different file-type.
Questions welcome (contact link below). And of course I would be happy to discuss photographic or editing commissions.
ctLow
PSE (13) Layer notes
Layers: several types:
- i) regular (i.e. image)
- ii) adjustment "fill" (solid, gradient or pattern)
- iii) adjustment "effect" (8 types)
-also - a) can make a copy of Background Layer to work on to simulate non-destructive editing (if the edits one wishes to perform are not one of ones available as "Adjustment Layers"), or can make Background Layer into a regular layer which removes some limitations of background, e.g. no transparent areas
-also, b) all layers can have multiples "modes", starting with "normal" (the usual), and opacities (so if less than 100% opacity, will show some of the an underlying layer through it)
- c) layers "stack" with the higher layers in the Layers Panel obscuring layers beneath them (unless their opacity is dropped or unless they have transparent areas, and transparent areas can be from either actually being transparent or by having parts of the layers "masked", except that "clipping masks" work differently)
- d) layers can be renamed for clarity for the user
Masks:
-attach to/on layers ... are not separate layers
-"white reveals, black conceals", which can be confusing when applied to a Fill Layer in which case it sometimes seems - but is not - reversed; and greys are intermediate
Clipping:
-"clipping" a layer attaches it to a specific layer (a "base" layer), so then does not affect all layers below it -only its base layer is affected
-this works differently for an Adjustment Layer than for a Fill Layer; with an Adjustment Layer, the adjustment effect only applies of course where there is content on the base layer (and then the Adjustment Layer can have its own Layer Mask, to make it more "interesting"), whereas with a Fill Layer, the fill only shows through where there is content on the base layer, without actually showing that content, i.e. transparent areas of the base layer remain transparent on the clipping layer, and areas of the base layer with content allow the fill on the Fill Layer to be visible (it's like a very special type of mask, which however unlike a regular mask does not depend on shades of grey); this is nothing to do with the oft-quoted mask memory-aid of "white reveals, black conceals", which only applies to layer masks, not clipping masks
-clipped layers retain the mode and opacity of the base layer
-the base and clipping layers do not need to remain in their original alignment, i.e. they can slide against each other, giving greater compositional versatility
-the base layer will then always be a "content" layer, e.g image or fill, which could also have its own layer mask; a clipping layer could be an image, fill or adjustment layer, which could also have its own layer mask; it can get complicated and the combinations are many, and what happens as you go working through it is not always intuitive.
Selecting:
-if you select part of an image or fill, then whatever you do next will be confined to that selection -make a new layer and it will be transparent outside the selection -do some mask-painting, and you won't be able to paint "outside the lines" -quite powerful and very cool -it can be a very fast way to make a new layer with a mask-from-the-selection, among other uses
Mask Copying:
-"load" the "old" mask with Opt-click; copy; click and load receiving mask; paste, Opt-click to unload
----
N.B. PSE 13 can only work in layers on 8-bit files, so 16-bit files must be converted (it's in the menus) prior to doing that. If you want the added colour-power of 16-bit, use different editing software.
Also, this isn't everything there is to know about layers - just some things which I needed to straighten out for myself.
Layers, Masks and Clipping in PSE 13 © 2015-2021 ctLow
-first posted: 2015-03-21
-updated: 2021-04-30